
如何在你的 Laravel 项目中使用 Inertia.js
已发表: 2022-12-08多页应用程序 (MPA) 越来越不流行了。 Facebook、Twitter、YouTube、Github 等著名平台已经在使用单页应用程序 (SPA) 技术。
这种流行的技术允许用户快速响应地使用 Web 应用程序,因为一切都是客户端呈现的。 但是,对于使用 Laravel 或 Django 等框架构建服务器端呈现应用程序的开发人员来说,这可能是一种痛苦。
幸运的是,Inertia.js 介入并进行了救援。
在本文中,我们将向您展示如何开始使用 Inertia.js 以及如何将其与 Laravel、Vue.js 和 Tailwind CSS 结合使用来创建现代博客 Web 应用程序。 我们还将分享如何使 SPA 对 SEO 更友好,以及一些其他技巧。
如果你刚刚开始使用 Laravel,我们建议你先阅读这篇文章,这样你就可以开始了。
为什么选择水疗?
在我们问为什么要使用 Inertia 之前,我们必须先问:“为什么是 SPA?”
为什么有人会比传统的服务器端应用程序更喜欢客户端呈现的应用程序? 什么会迫使全栈 Laravel 开发人员告别刀片组件?
简短的回答:因为速度和响应能力对于任何成功的用户参与都是必不可少的。
对于 MPA,浏览器会不断向后端发送请求,然后后端会执行大量数据库查询。 在数据库和服务器处理查询并将它们传递给浏览器之后,页面就呈现出来了。
但是SPA不一样。 该应用程序将用户需要的所有内容直接带到页面,无需浏览器发送查询或重新加载页面以呈现新的 HTML 元素。
由于这种独一无二的用户体验,许多知名公司都在呼吁将他们的网站变成单页应用程序。
话虽如此,创建单页应用程序对于 Laravel 开发人员来说可能很困难,因为这将要求他们开始使用 Vue.js 或 React 而不是 blade 模板,从而导致失去许多节省时间和精力的 Laravel gem。
不过,现在有了 Inertia.js,一切都变了。
为什么是惯性?
如果 Laravel 开发人员要在 Inertia 之前使用 Vue 构建 web SPA,他们必须设置 API 并使用 Laravel 返回 JSON 数据,然后使用 AXIOS 之类的东西来检索 Vue 组件中的数据。 他们还需要 Vue Router 之类的东西来管理路由,这将意味着失去 Laravel 路由,以及中间件和控制器。
另一方面,Inertia.js 使开发人员能够使用经典的服务器端路由和控制器构建现代单页 Vue、React 和 Svelte 应用程序。 Inertia 专为 Laravel、Ruby on Rails 和 Django 开发人员设计,允许他们在不更改创建控制器、从数据库获取数据和呈现视图的编码技术的情况下构建应用程序
感谢 Inertia.js,Laravel 开发人员将感到宾至如归。
惯性如何运作
仅使用 Laravel 和 Vue 构建 SPA 将为您的前端提供完整的 JavaScript 页面,但这不会为您提供单页面应用程序体验。 每个单击的链接都会导致您的客户端框架在下一个页面加载时重新启动。
这就是惯性发挥作用的地方。
Inertia 基本上是一个客户端路由库。 它允许您在页面之间导航而无需重新加载整个页面。 这是通过<Link>组件实现的,它是一个围绕标准锚标记的轻量级包装器。
当您单击 Inertia 链接时,Inertia 会拦截单击并将您重定向到 XHR。 浏览器不会以这种方式重新加载页面,从而为用户提供完整的单页体验。
惯性入门
为了了解 Inertia 以及如何将它与 Laravel 集成,我们将使用最强大的组合构建一个名为Kinsta Blog的博客 Web 应用程序,Laravel 用于后端,Vue.js 用于 JavaScript 前端,Tailwind CSS 用于样式。
如果您更喜欢在本地环境中学习本教程,您可以使用 DevKinsta,它是开发人员、设计人员和代理机构的强大工具,使他们能够构建单页和多页 WordPress Web 应用程序。 幸运的是,使用 Corcel 包可以轻松地将 WordPress 与 Laravel 集成。
先决条件
要充分利用本教程,您应该熟悉以下内容:
- Laravel 基础知识(安装、数据库、数据库迁移、Eloquent 模型、控制器和路由)
- Vue.js 基础知识(安装、结构和表单)
如果您不确定,请查看这些精彩的 Laravel 免费和付费教程。 否则,让我们开始吧。
第一步:安装核心元素
要专注于 Inertia.js 并立即进入有趣的部分,请确保您已准备好以下设置:
- 新安装的名为
kinsta-blog的 Laravel 9 项目 - 在我们的 Laravel 项目中安装了 Tailwind CSS CLI
- kinsta-blog/resources/views中的两个刀片组件,用于查看博客的主页和博客上的一篇文章,如下所示:
“ /resources/views/index.blade.php ”:
<!DOCTYPE html> <html lang="{{ str_replace('_', '-', app()->getLocale()) }}"> <head> <meta charset="utf-8" /> <meta name="viewport" content="width=device-width, initial-scale=1" /> <title>Kinsta Blog</title> </head> <body> <header> <h1>Kinsta Blog</h1> </header> <main> <h2>Read our latest articles</h2> <section> <article> <div> <img src="/images/kinsta-logo.png" alt="Article thumbnail" /> </div> <h3>Title for the blog</h3> <p> Lorem, ipsum dolor sit amet consectetur adipisicing elit. Illum rem itaque error vel perferendis aliquam numquam dignissimos, expedita perspiciatis consectetur! </p> <a href="#">Read more</a> </article> </section> </main> <footer> <h2>Join our Newsletter</h2> <input type="email" /> </footer> </body> </html>“ /resources/views/show.blade.php ”:
<!DOCTYPE html> <html lang="{{ str_replace('_', '-', app()->getLocale()) }}"> <head> <meta charset="utf-8" /> <meta name="viewport" content="width=device-width, initial-scale=1" /> <title>Kinsta Blog</title> </head> <body> <main> <article> <div> <img src="/images/kinsta-logo.png" alt="Article thumbnail" /> </div> <h1>Title for the blog</h1> <p>Article content goes here</p> </article> </main> <footer> <h2>Join our Newsletter</h2> <input type="email" /> </footer> </body> </html> - 连接到我们项目的名为
kinsta_blog的 MySQL 本地数据库:“ .env ”:
DB_CONNECTION=mysql DB_HOST=127.0.0.1 DB_PORT=3306 DB_DATABASE=kinsta_blog DB_USERNAME=root DB_PASSWORD= - 文章模型、迁移和工厂:
“app/Models/ Article.php ”:
<?php namespace AppModels; use IlluminateDatabaseEloquentFactoriesHasFactory; use IlluminateDatabaseEloquentModel; class Article extends Model { use HasFactory; protected $fillable = ['title', 'excerpt', 'body']; }“数据库/迁移/create_articles_table.php ”:
<?php use IlluminateDatabaseMigrationsMigration; use IlluminateDatabaseSchemaBlueprint; use IlluminateSupportFacadesSchema; return new class extends Migration { public function up() { Schema::create('articles', function (Blueprint $table) { $table->id(); $table->string('title'); $table->text('excerpt'); $table->text('body'); $table->timestamps(); }); } public function down() { Schema::dropIfExists('articles'); } };“数据库/工厂/ArticleFactory.php ”:
<?php namespace DatabaseFactories; use IlluminateDatabaseEloquentFactoriesFactory; class ArticleFactory extends Factory { public function definition() { return [ 'title' => $this->faker->sentence(6), 'excerpt' => $this->faker->paragraph(4), 'body' => $this->faker->paragraph(15), ]; } }
这就是我们需要开始的全部! 现在让我们言归正传,将 Inertia.js 引入到我们的项目中。
第 2 步:安装惯性
Inertia 安装过程分为两个主要阶段:服务器端(Laravel)和客户端(VueJs)。
Inertia 文档中的官方安装指南有点过时,因为 Laravel 9 现在默认使用 Vite,但我们也会通过它。
1.服务器端
我们需要做的第一件事是通过 Composer 使用以下终端命令安装 Inertia 服务器端适配器。
composer require inertiajs/inertia-laravel现在我们将设置我们的根模板,它将是一个用于加载您的 CSS 和 JS 文件的刀片文件,以及一个将用于启动我们的 JavaScript 应用程序的惯性根。
因为我们使用的是最新版本的 Laravel 9 v9.3.1,我们还必须通过将 Vite 包含在/resources/views/app.blade.php的标签中来启用 Vite 以发挥其魔力:
<!DOCTYPE html> <html lang="{{ str_replace('_', '-', app()->getLocale()) }}"> <head> <meta charset="utf-8" /> <meta name="viewport" content="width=device-width, initial-scale=1" /> <!-- Fetch project name dynamically --> <title inertia>{{ config('app.name', 'Laravel') }}</title> <!-- Scripts --> @vite('resources/js/app.js') @inertiaHead </head> <body class="font-sans antialiased"> @inertia </body> </html> 请注意我们如何通过将Inertia属性添加到<title>标签来动态获取项目标题。
我们还在头部添加了@vite指令,以便让 Vite 知道我们创建应用程序和导入 CSS 的 JavaScript 主文件的路径。 Vite 是一种有助于 JavaScript 和 CSS 开发的工具,它允许开发人员在本地开发期间无需刷新页面即可查看前端更改。
我们的下一步是创建HandleInertiaRequests中间件并将其发布到我们的项目中。 我们可以通过在项目的根目录中触发以下终端命令来做到这一点:
php artisan inertia:middleware 完成后,前往“App/Http/ Kernel ”并将HandleInertiaRequests注册为 Web 中间件中的最后一项:
'web' => [ // ... AppHttpMiddlewareHandleInertiaRequests::class, ],2.客户端
接下来,我们必须以与服务器端相同的方式安装前端 Vue.js 3 依赖项:
npm install @inertiajs/inertia @inertiajs/inertia-vue3 // or yarn add @inertiajs/inertia @inertiajs/inertia-vue3接下来,您需要引入 Vue.js 3:
npm install [email protected]然后更新您的主要 JavaScript 文件以使用 Vue.js 3、Vite 和 Laravel 初始化 Inertia.js:
“资源/js/app.js ”:
import "./bootstrap"; import "../css/app.css"; import { createApp, h } from "vue"; import { createInertiaApp } from "@inertiajs/inertia-vue3"; import { resolvePageComponent } from "laravel-vite-plugin/inertia-helpers"; createInertiaApp({ title: (title) => `${title} - ${appName}`, resolve: (name) => resolvePageComponent( `./Pages/${name}.vue`, import.meta.glob("./Pages/**/*.vue") ), setup({ el, app, props, plugin }) { return createApp({ render: () => h(app, props) }) .use(plugin) .mount(el); }, }); 在上面的代码片段中,我们使用了 Laravel 的插件resolvePageComponent ,我们告诉它从目录./Pages/$name.vue中解析我们的组件。 这是因为我们稍后会在项目中将我们的 Inertia 组件保存在这个目录中,而这个插件将帮助我们自动从正确的目录加载这些组件。
剩下的就是安装vitejs/plugin-vue :
npm i @vitejs/plugin-vue并更新vite.config.js文件:
import { defineConfig } from "vite"; import laravel from "laravel-vite-plugin"; import vue from "@vitejs/plugin-vue"; export default defineConfig({ plugins: [ laravel({ input: ["resources/css/app.css", "resources/js/app.js"], refresh: true, }), vue({ template: { transformAssetUrls: { base: null, includeAbsolute: false, }, }, }), ], });最后一步是安装我们的依赖项并编译我们的文件:
npm install npm run dev瞧! 您已经拥有一个使用 Vue.js 3 和 Vite 的 Laravel 9 应用程序。 现在我们需要看到实际发生的事情!
创建惯性页面
您还记得用于查看我们的主页和一篇文章的那两个刀片文件( index和show )吗?
使用 Inertia 时我们唯一需要的刀片文件是app.blade.php ,我们在安装 Inertia 时已经使用过一次。 那么现在这些文件会怎样呢?
我们会将这些文件从刀片组件转换为 Inertia.js 组件。
应用程序中的每个页面都有自己的控制器和带有 Inertia 的 JavaScript 组件。 这使您可以仅获取该页面所需的数据,而无需使用 API。 惯性页面只不过是 JavaScript 组件,在我们的例子中,它们是 Vue.js 组件。 他们没有什么特别值得注意的地方。 所以我们要做的是将所有 HTML 内容包装在<template>标签之间,任何与 JavaScript 相关的内容都将用<script>标签包装。
创建一个名为“Pages”的文件夹并将文件移到那里。 所以我们将在“ ./resources/js/Pages ”中包含“ index.blade.php ”和“ show.blade.php ”。 然后我们将文件格式更改为“.vue”而不是“.blade.php”,同时将其名称的首字母大写并将其内容转换为标准的 Vue.js 组件。 我们将排除<html> 、 <head>和<body>标签,因为它们已经包含在主根刀片组件中。
“resources/js/Pages/ Index.vue ”:
<script setup> // </script> <template> <header> <h1>Kinsta Blog</h1> </header> <main> <h2>Read our latest articles</h2> <section> <article> <div> <img src="/images/kinsta-logo.png" alt="Article thumbnail" /> </div> <h3>Title for the blog</h3> <p> Lorem, ipsum dolor sit amet consectetur adipisicing elit. Illum rem itaque error vel perferendis aliquam numquam dignissimos, expedita perspiciatis consectetur! </p> <a href="#">Read more</a> </article> </section> </main> <footer> <h2>Join our Newsletter</h2> <input type="email" /> </footer> </template>“resources/js/Pages/ Show.vue ”:
<script setup> // </script> <template> <header> <h1>Welcome to Kinsta Blog</h1> </header> <main> <article> <h1>Title for the blog</h1> <p>Article content goes here</p> </article> </main> <footer> <h2>Join our Newsletter</h2> <input type="email" /> </footer> </template>有件事真的很困扰我! 我们一直在每个组件中复制和粘贴我们的页眉和页脚,这不是一个很好的做法。 让我们创建一个 Inertia 基本布局来存储我们的持久化组件。
在“ /resources/js ”中创建一个名为“Layouts”的文件夹,并在该文件夹中创建一个名为“KinstaLayout.vue”的文件。 这个文件将包含我们的页眉和页脚以及带有<slot />的main文件,以允许用此布局包裹的所有组件嵌入其中。 该文件应如下所示:
“资源/js/Layouts/ KinstaLayout.vue ”:
<script setup></script> <template> <header> <h1>Kinsta Blog</h1> </header> <main> <slot /> </main> <footer> <h2>Join our Newsletter</h2> <input type="email" /> </footer> </template>然后我们将在我们的页面中导入这个新布局并用它包装所有 HTML 内容。 我们的组件应该是这样的:
索引.vue :
<script setup> import KinstaLayout from "../Layouts/KinstaLayout.vue"; </script> <template> <KinstaLayout> <section> <h2>Read our latest articles</h2> <article> <div> <img src="/images/kinsta-logo.png" alt="Article thumbnail" /> </div> <h3>Title for the blog</h3> <p> Lorem, ipsum dolor sit amet consectetur adipisicing elit. Illum rem itaque error vel perferendis aliquam numquam dignissimos, expedita perspiciatis consectetur! </p> <a href="#">Read more</a> </article> </section> </KinstaLayout> </template>显示.vue :
<script setup> import KinstaLayout from "../Layouts/KinstaLayout.vue"; </script> <template> <KinstaLayout> <article> <h1>Title for the blog</h1> <p>Article content goes here</p> </article> </KinstaLayout> </template> Laravel 路由和惯性渲染
首先让我们使用我们从教程起点获得的“ ArticleFactory ”文件,并将一些文章播种到我们的数据库中。
“数据库/seeders/databaseSeeder.php”:
<?php namespace DatabaseSeeders; use AppModelsArticle; use IlluminateDatabaseSeeder; class DatabaseSeeder extends Seeder { public function run() { Article::factory(10)->create(); } }然后点击下面的终端命令来迁移你的表并从工厂中植入假数据:
php artisan migrate:fresh --seed这将在数据库中创建 10 篇假文章,我们需要使用 Laravel 路由将其传递给我们的视图。 现在我们使用 Inertia 来渲染视图,我们用来编写路由的方式将略有改变。 让我们在“routes/ web.php ”中创建我们的第一个 Laravel Inertia 路由,并从“ /resources/js/Pages/Index.vue ”返回主页视图。
“routes/ web.php ”:
<?php use AppModelsArticle; use IlluminateSupportFacadesRoute; use InertiaInertia; Route::get('/', function () { return Inertia::render('Index', [ 'articles' => Article::latest()->get() ]); })->name('home'); 请注意,我们导入了Inertia并且没有使用view() Laravel 助手来返回视图,而是使用了Inertia::render 。 默认情况下,Inertia 还会在“resources/js”的页面文件夹中查找我们在路由中提到的文件名。
前往索引文件并将检索到的数据设置为 prop 并使用v-for循环它们以显示结果。 在脚本标签之间,将传递的数据定义为道具。 Inertia 需要知道的只是您期望的数据类型,在我们的例子中是包含文章数组的“文章”对象。
“resources/js/Pages/ Index.vue ”:
<script setup> import KinstaLayout from "../Layouts/KinstaLayout.vue"; defineProps({ Articles: Object, }); </script> 请注意,仅将其定义为道具而不返回它就足够了,因为我们使用的是 Vue.js 3 组合 API 的setup格式。 如果我们使用选项 API,那么我们需要返回它。
让我们做一个循环:
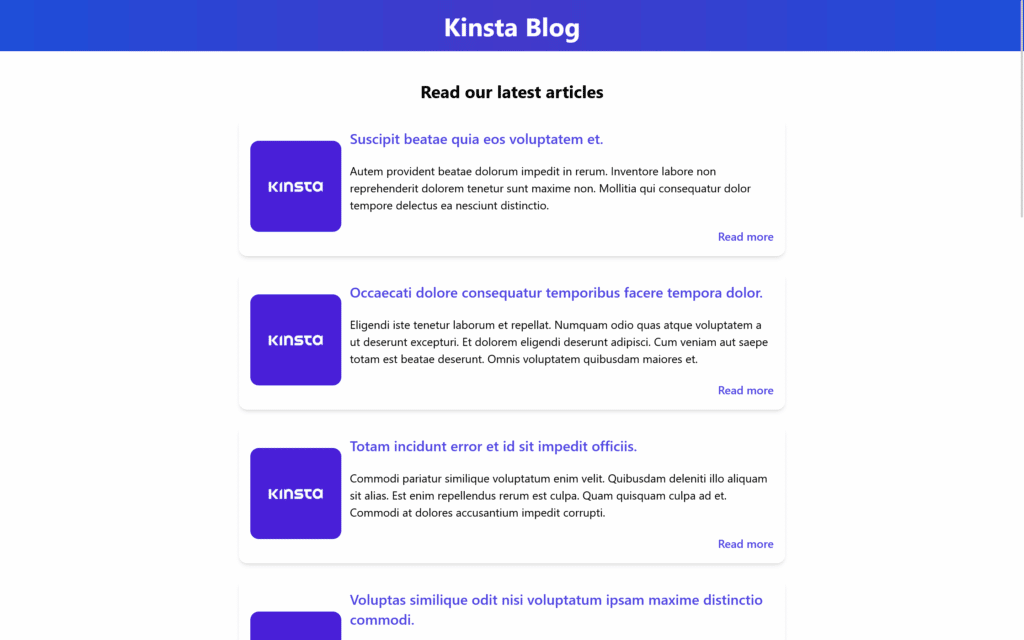
<template> <KinstaLayout> <h2>Read our latest articles</h2> <section> // Looping over articles <article v-for="article in articles":key="article.id"> <div> <img src="/images/kinsta-logo.png" alt="Article thumbnail" /> </div> <h3>{{article.title}}</h3> <p>{{article.excerpt}}</p> <a href="#">Read more</a> </article> </section> </KinstaLayout> </template> npm run dev (让它继续运行,因为我们使用的是 Vite)和php artisan serve启动 laravel 开发服务器并访问我们的网站,我们将看到预期的页面显示数据库中的所有十篇文章。

现在,我们正在使用 Google Chrome 的 Vue DevTools 扩展,它允许我们调试我的应用程序。 让我们向您展示我们的数据是如何传递给组件的。
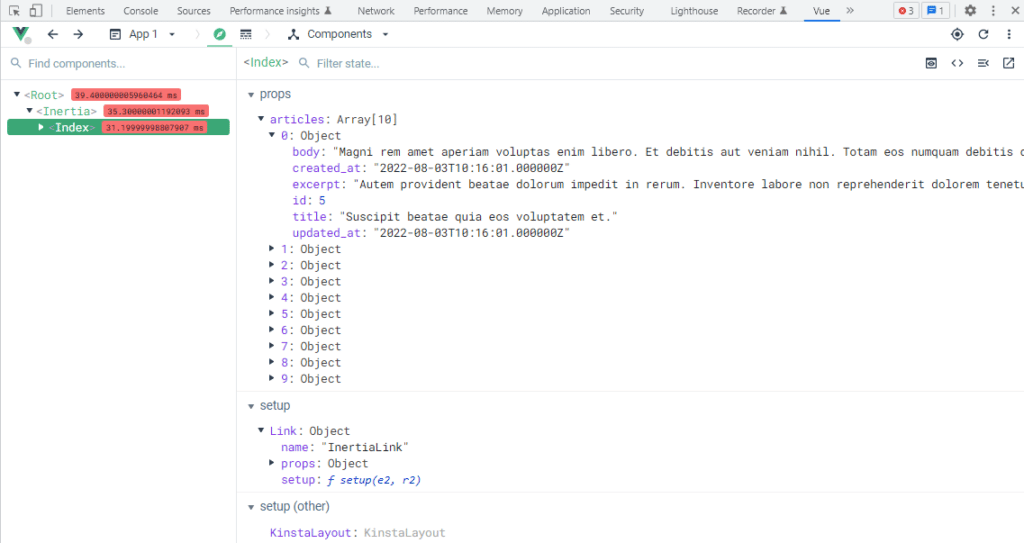
“文章”作为包含文章数组的道具对象传递给组件; 数组中的每篇文章也是一个对象,其属性与它从数据库中获取的数据相对应。 这意味着我们从 Laravel 传输到 Inertia 的任何数据都将被视为道具。
在 Inertia.js 中使用 Tailwind CSS
由于 Tailwind 已经安装在我们项目的起点,所以我们需要做的就是告诉它读取我们的 Inertia 组件。 这可以通过如下编辑“ tailwind.config.js ”来完成:
/** @type {import('tailwindcss').Config} */ module.exports = { content: [ "./storage/framework/views/*.php", "./resources/views/**/*.blade.php", "./resources/js/**/*.vue", ], theme: { extend: {}, }, plugins: [], };然后确保我们已经在“resources/js/ app.js ”中导入了我们的 CSS 文件:
import "../css/app.css";现在我们准备好设计我们的组件了。
“resources/js/Pages/ Index.vue ”:
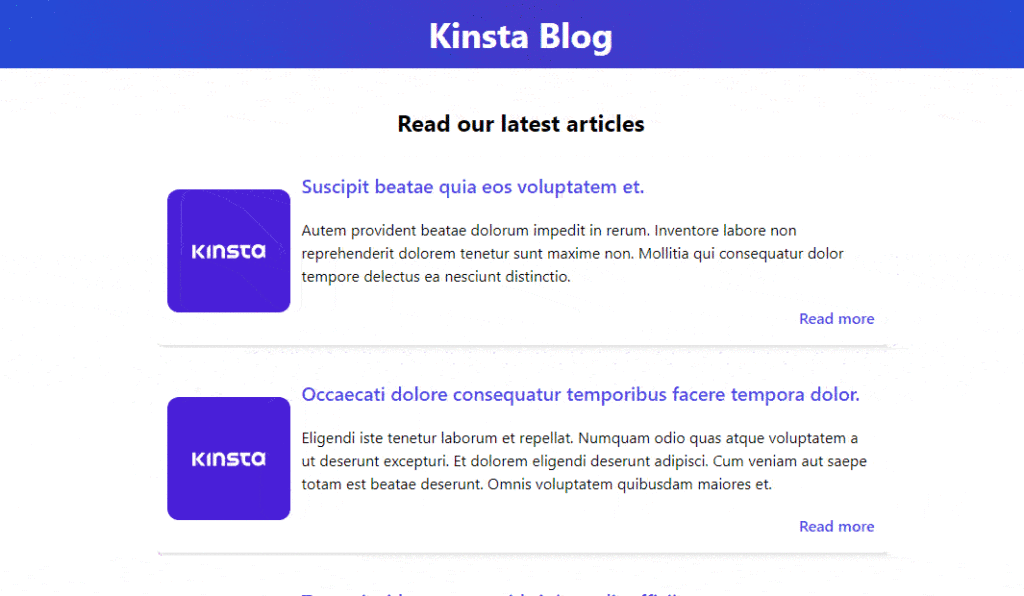
<script setup> import KinstaLayout from "../Layouts/KinstaLayout.vue"; defineProps({ articles: Object, }); </script> <template> <KinstaLayout> <h2 class="text-2xl font-bold py-10">Read our latest articles</h2> <section class="space-y-5 border-b-2 pb-10"> <article v-for="article in articles" :key="article.id" class="flex justify-center items-center shadow-md bg-white rounded-xl p-4 mx-auto max-w-3xl" > <img src="/images/kinsta-logo.png" class="w-32 h-32 rounded-xl object-cover" alt="" /> <div class="flex flex-col text-left justify-between pl-3 space-y-5"> <h3 class="text-xl font-semibold text-indigo-600 hover:text-indigo-800" > <a href="#">{{ article.title }}</a> </h3> <p> {{ article.excerpt }} </p> <a href="#" class="text-indigo-600 hover:text-indigo-800 w-fit self-end font-semibold" >Read more</a > </div> </article> </section> </KinstaLayout> </template>“资源/js/Layouts/ KinstaLayout.vue ”:
<script setup></script> <template> <Header class="bg-gradient-to-r from-blue-700 via-indigo-700 to-blue-700 w-full text-center py-4" > <h1 class="text-white font-bold text-4xl">Kinsta Blog</h1> </Header> <main class="container mx-auto text-center"> <slot /> </main> <footer class="bg-gradient-to-b from-transparent to-gray-300 w-full text-center mt-5 py-10 mx-auto" > <h2 class="font-bold text-xl pb-5">Join our Newsletter</h2> <input class="rounded-xl w-80 h-12 px-3 py-2 shadow-md" type="email" placeholder="Write your email.." /> </footer> </template>如果你查看浏览器,你会注意到 Vite 已经使用 Tailwind 魔法更新了页面。
惯性链接
现在我们有一个可以显示数据库中所有文章的工作主页,我们需要创建另一个路由来显示单个文章。 让我们创建一个新路由并将 URL 设置为“id”通配符:
“路线/ web.php ”
<?php use AppModelsArticle; use IlluminateSupportFacadesRoute; use InertiaInertia; Route::get('/', function () { return Inertia::render('Index', [ 'articles' => Article::latest()->get() ]); })->name('home'); Route::get('/posts/{article:id}', function (Article $article) { return Inertia::render('Show', [ 'article' => $article ]); })->name('article.show');我们导入了“Article”模型并添加了一个新路由来返回Show.vue Inertia 组件。 我们还利用了 Laravel 的路由模型绑定,它允许 Laravel 自动获取我们所指的文章。
我们现在需要的是一种通过单击主页上的链接而无需重新加载整个页面来访问此路由的方法。 这可以通过 Inertia 的神奇工具<Link>来实现。 我们在介绍中提到 Inertia 使用<Link>作为标准锚标记<a>的包装器,并且该包装器旨在使页面访问尽可能无缝。 在 Inertia 中, <Link>标签可以充当执行<GET>请求的锚标签,但它也可以同时充当<button>和<form> 。 让我们看看如何将它应用到我们的项目中。
在我们的 Index.vue 中,我们将从 Inertia 导入<Link> ,并删除锚标签<a>并将其替换为 Inertia <Link>标签。 href属性将设置为我们之前为查看文章而创建的路由 URL:
<script setup> import KinstaLayout from "../Layouts/KinstaLayout.vue"; import { Link } from "@inertiajs/inertia-vue3"; defineProps({ articles: Object, }); </script> <template> <KinstaLayout> <section class="space-y-5 border-b-2 pb-10"> <h2 class="text-2xl font-bold pt-10 mx-auto text-center"> Read our latest articles </h2> <article v-for="article in articles" :key="article.id" class="flex justify-center items-center shadow-md bg-white rounded-xl p-4 mx-auto max-w-3xl" > <img src="/images/kinsta-logo.png" class="w-32 h-32 rounded-xl object-cover" alt="" /> <div class="flex flex-col text-left justify-between pl-3 space-y-5" > <h3 class="text-xl font-semibold text-indigo-600 hover:text-indigo-800" > <Link :href="'/posts/' + article.id">{{ article.title }}</Link> </h3> <p> {{ article.excerpt }} </p> <Link :href="'/posts/' + article.id" class="text-indigo-600 hover:text-indigo-800 w-fit self-end font-semibold" >Read more </Link> </div> </article> </section> </KinstaLayout> </template>让我们使用 Tailwind 为Show.vue设计样式,让它看起来更盛装一点,为我们的访问做好准备。 我们还需要让它知道它应该期待一个“文章”对象并将其设置为道具:
<script setup> import KinstaLayout from "../Layouts/KinstaLayout.vue"; defineProps({ article: Object, }); </script> <template> <KinstaLayout> <article class="mx-auto mt-10 flex justify-center max-w-5xl border-b-2"> <img src="/images/kinsta-logo.png" class="w-80 h-80 rounded-xl mx-auto py-5" alt="" /> <div class="text-left flex flex-col pt-5 pb-10 px-10"> <h1 class="text-xl font-semibold mb-10">{{ article.title }}</h1> <p>{{ article.body }}</p> </div> </article> </KinstaLayout> </template>现在,当我们点击文章标题或“阅读更多”时,我们将神奇地传送到Show.vue而无需刷新页面。
在我们的例子中,我们使用<Link>作为向路由发送GET请求并返回新数据的锚标记,但我们也可以使用<Link>进行POST 、 PUT 、 PATCH和DELETE
“routes/ web.php ”:
<Link href="/logout" method="post" as="button" type="button">Logout</Link>你应该知道的 Laravel Inertia 提示和技巧
我们现在有一个使用 Laravel、Inertia 和 Tailwind CSS 构建的工作 SPA。 但是惯性可以帮助我们取得更多成就。 是时候学习一些对开发人员和应用程序访问者都有帮助的惯性技术了。
生成网址
您可能已经注意到我们一直在为我们的 Laravel 路由添加名称而不使用它。 Inertia 允许我们在我们的组件中使用我们命名的路由,而不是手动写下完整的路由。
我们可以通过在我们的项目中安装 Ziggy 包来实现这一点:
composer require tightenco/ziggy然后前往“resources/js/app.js”并像这样更新它:
import "./bootstrap"; import "../css/app.css"; import { createApp, h } from "vue"; import { createInertiaApp } from "@inertiajs/inertia-vue3"; import { resolvePageComponent } from "laravel-vite-plugin/inertia-helpers"; import { ZiggyVue } from "../../vendor/tightenco/ziggy/dist/vue.m"; createInertiaApp({ title: (title) => `${title} - ${appName}`, resolve: (name) => resolvePageComponent( `./Pages/${name}.vue`, import.meta.glob("./Pages/**/*.vue") ), setup({ el, app, props, plugin }) { return createApp({ render: () => h(app, props) }) .use(plugin) .use(ZiggyVue, Ziggy) .mount(el); }, }); 前往“ /resources/views/app.blade.php ”并使用@route指令更新头部:
<!DOCTYPE html> <html lang="{{ str_replace('_', '-', app()->getLocale()) }}"> <head> <meta charset="utf-8"> <meta name="viewport" content="width=device-width, initial-scale=1"> <!-- Fetch project name dynamically --> <title inertia>{{ config('app.name', 'Laravel') }}</title> <!-- Scripts --> @routes @vite('resources/js/app.js') @inertiaHead </head> <body class="font-sans antialiased"> @inertia </body> </html>…并通过点击以下两个终端命令来刷新你的 NPM 包:
npm install && npm run dev这个包允许我们在我们的 Inertia 组件中使用命名路由,所以让我们前往Index.vue并删除旧的手动路由并将其替换为路由名称,同时像在我们的控制器中一样正常传递数据。
我们将替换这个:
<Link :href="'/posts/' + article.id"> {{ article.title }} </Link>…有了这个:
<Link :href="route('article.show', article.id)"> {{ article.title }} </Link>这将为我们提供完全相同的行为,但它对开发人员更友好,并且在您的路线需要许多参数时非常有用。
进度指标
这是 Inertia.js 最好的特性之一; 因为 SPA 提供了交互式用户体验,所以在请求是否正在加载时获得持续反馈将是应用程序的绝佳补充。 这可以通过 Inertia 提供的单独库来实现。
“@inertiajs/progress”库是 NProgress 的包装器,它根据惯性事件有条件地显示加载指示器。 你真的不需要知道它在幕后是如何工作的,所以让我们让它工作吧。
我们可以使用以下终端命令安装这个库:
npm install @inertiajs/progress安装完成后,我们需要将其导入“ resources/js/app.js ”
import "./bootstrap"; import "../css/app.css"; import { createApp, h } from "vue"; import { createInertiaApp } from "@inertiajs/inertia-vue3"; import { resolvePageComponent } from "laravel-vite-plugin/inertia-helpers"; import { ZiggyVue } from "../../vendor/tightenco/ziggy/dist/vue.m"; import { InertiaProgress } from "@inertiajs/progress"; createInertiaApp({ title: (title) => `${title} - ${appName}`, resolve: (name) => resolvePageComponent( `./Pages/${name}.vue`, import.meta.glob("./Pages/**/*.vue") ), setup({ el, app, props, plugin }) { return createApp({ render: () => h(app, props) }) .use(plugin) .use(ZiggyVue, Ziggy) .mount(el); }, }); InertiaProgress.init({ color: "#000000", showSpinner: true });这将显示一个加载栏和一个黑色的加载微调器,但我们可以更改颜色以及可以在 Inertia.js 进度指示器文档中找到的其他有用选项。

滚动管理
在某些情况下,您可能希望在保持相同滚动位置的同时导航到新页面。 如果您允许用户发表评论,也许您会需要它; 这将提交一个表单并将新评论从数据库加载到您的组件中; 您会希望在用户丢失滚动位置的情况下发生这种情况。 惯性为我们解决了这个问题。
在我们的例子中,让我们将其应用于Index.vue中的<Link>标签。 要在使用 Inertia 的<Link>重定向到不同页面时保留滚动位置,我们需要做的就是将preserve-scroll属性添加到<Link> :
<Link :href="route('article.show', article.id)" preserve-scroll> {{ article.title }} </Link>搜索引擎优化技巧
自SPA诞生以来,人们就一直关注搜索引擎优化(SEO)。 众所周知,如果您使用 SPA 方法,搜索引擎将很难抓取您的 Web 应用程序,因为所有内容都是客户端呈现的,导致您的网站不会显示在搜索结果的顶部; 尽管如此,为什么像 Facebook 和 Github 这样的流行平台现在是 SPA,并且在 SEO 中仍然表现良好?
嗯,这不是任务:不再是不可能的了。 Inertia 提供了一些解决方案来帮助您的 SPA 变得对 SEO 友好。
使用 Laravel 和 Vite 的惯性 Vue SSR
搜索引擎总是在您的网站上寻找 HTML 以识别内容; 但是,如果您的 URL 中没有 HTML,这项工作就会变得更加困难。 开发 SPA 时,页面上只有 JavaScript 和 JSON。 Inertia 引入了服务器端渲染 (SSR) 功能,您可以将其添加到您的应用程序中。 这允许您的应用程序在服务器上预呈现初始页面访问,然后将呈现的 HTML 发送到浏览器。 这使用户可以在页面完全加载之前查看您的页面并与之交互,而且它还有其他优势,例如缩短搜索引擎为您的网站编制索引所需的时间。
总结一下它的工作原理,Inertia 将识别它是否在 Node.js 服务器上运行,并将组件名称、属性、URL 和资产版本呈现为 HTML。 这将为用户和搜索引擎提供您的页面所提供的几乎所有内容。
然而,因为我们正在处理 Laravel,所以这没有什么意义,因为 Laravel 是一个 PHP 框架并且不在 Node.js 服务器上运行。 因此,我们会将请求转发给 Node.js 服务,该服务将呈现页面并返回 HTML。 默认情况下,这将使我们的 Laravel Vue 应用程序 SEO 友好。
首先,我们需要安装 Vue.js SSR npm 包:
npm install @vue/server-renderer另一个有用的 Inertia“NPM”包提供了一个简单的“HTTP”服务器。 强烈建议您安装它:
npm install @inertiajs/server然后,在“resources/js/”中,我们将添加一个名为ssr.js的新文件。 这个文件与我们在安装 Inertia 时创建的app.js文件非常相似,只是它会在 Node.js 而不是浏览器中执行:
import { createSSRApp, h } from "vue"; import { renderToString } from "@vue/server-renderer"; import { createInertiaApp } from "@inertiajs/inertia-vue3"; import createServer from "@inertiajs/server"; import { resolvePageComponent } from "laravel-vite-plugin/inertia-helpers"; import { ZiggyVue } from "../../vendor/tightenco/ziggy/dist/vue.m"; const appName = "Laravel"; createServer((page) => createInertiaApp({ page, render: renderToString, title: (title) => `${title} - ${appName}`, resolve: (name) => resolvePageComponent( `./Pages/${name}.vue`, import.meta.glob("./Pages/**/*.vue") ), setup({ app, props, plugin }) { return createSSRApp({ render: () => h(app, props) }) .use(plugin) .use(ZiggyVue, { ...page.props.ziggy, location: new URL(page.props.ziggy.location), }); }, }) );Make sure not to include everything in the ssr.js file since it will not be visible to visitors; this file is only for search engines and browsers to show the data within your page, so include only what is important to your data or only what will make your data available.
“By default, Inertia's SSR server will operate on port 13714. However, you can change this by providing a second argument to the createServer method.” Inertia DOCss.
The Inertia.js DOCs aren't explaining how to integrate Inertia SSR with Vite, but we will go through this now. Head to vite.config.js and paste the below:
import { defineConfig } from "vite"; import laravel from "laravel-vite-plugin"; import vue from "@vitejs/plugin-vue"; export default defineConfig({ plugins: [ laravel({ input: "resources/js/app.js", ssr: "resources/js/ssr.js", }), vue({ template: { transformAssetUrls: { base: null, includeAbsolute: false, }, }, }), ], });Next, head to package.json and change the build script:
"build": "vite build && vite build --ssr" Now if we run npm run build , Vite will build our SSR bundle for production. For more information about this you may visit Inertia SSR DOCs and Vite SSR DOCs.
Title and Meta
Because JavaScript applications are rendered within the document's <body> , they cannot render markup to the document's <head> because it is outside of their scope. Inertia has a <Head> component that may be used to set the page <title> , <meta> tags, and other <head> components.
To add <head> element to your Page, we must import <head> from Inertia same as we did with <Link> component:
import { Head } from '@inertiajs/inertia-vue3' <Head> <title>Kinsta Blog</title> <meta name="description" content="Kinsta blog for developers"> </Head>我们还可以为所有页面添加一个全局标题,这将在每个页面的标题旁边添加您的应用程序名称。 我们已经在app.js文件中这样做了:
createInertiaApp({ title: (title) => `${title} - ${appName}`, // }); 这意味着,如果我们在应用程序的主页中添加带有标题的<head title="Homepage"> ,它将呈现如下: <title>Home - My App</title> 。
监控您的应用
速度是优化网站 SEO 性能的最重要因素之一。 如果您的网站使用 WordPress,那么 Kinsta APM 将协助您监控和密切关注您的应用程序。 它可以帮助您识别 WordPress 性能问题,并且在所有 Kinsta 托管的网站上免费提供。
概括
Inertia.js 是最重要的可用技术之一; 将它与 Laravel 结合使用,您将拥有一个使用 PHP 和 JavaScript 构建的现代单页应用程序。 Laravel 的创建者 Taylor Otwell 对 Inertia 如此感兴趣,以至于 Laravel 推出了其最受欢迎的入门套件 Laravel Breeze 和 Jetstream,并支持 Inertia 和 SSR。
文
如果您是 Laravel 粉丝或专业开发人员,Inertia.js 无疑会吸引您的眼球。 在本教程中,我们只用了几分钟就创建了一个非常基础和直接的博客。 关于惯性还有很多东西需要学习,这可能只是众多文章和教程中的第一篇。
关于 Laravel,您还希望我们探索什么? 请在下面的评论部分告诉我们。